

Create great product shots for your website
Good product shots of items will increase sales. Using a professional photographer will give you professional, crisp shots that will enhance the look of the product, however if you don’t have the budget to spend, Sara Moseley takes us through how to photograph great product shots inexpensively.
[ms-protect-content id=”7823, 7822, 7825, 7826, 7827, 7824, 7819″]
Create a ‘photo booth’ from a few items in your kitchen!
Join two pieces of A4 white paper together at the back to create a seamless background. Place them on the kitchen surface and tape the paper to the wall to secure it.
Cover a tablemat with silver foil and prop it against the wall. Place another tablemat on the other side to support a piece of A4 white paper. The tablemats will reflect light back onto the subject and soften shadows. Place the subject on the paper and angle the light on to the top and front of the subject. Diffuse and soften the light further by placing a sheet of greaseproof paper over the top of the ‘booth’. Shadows are now softened and you have a more professionally lit product.
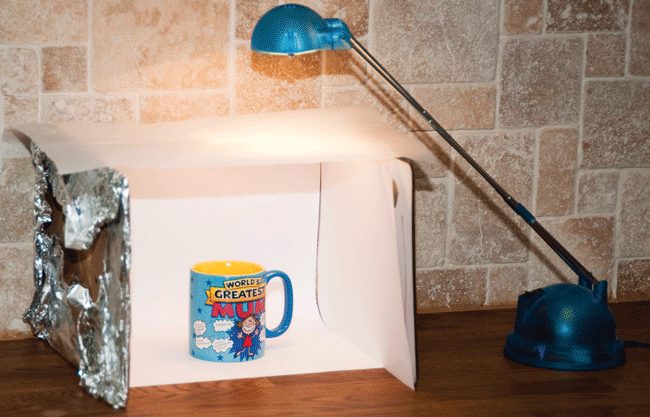
The inexpensive ‘photo booth’
Ensure your camera’s automatic flash is turned off, as you don’t want to add any further light and take the photograph. To enhance the photograph further use some image-editing software. Most cameras come with a package. This enables you to crop, adjust the brightness and contrast and sharpen your image further.
Summary
- Pick a clutter-free plain background so the product is the main focus.
- Keep your backgrounds uniform to create a professional feel to your site.
- A well-lit product will show its details, textures and features clearly, making it more appealing.
- Fill the frame. A little white space is good to frame the item. However you don’t want the subject to look small and lost in the photograph.
- Ensure the product is in focus. A focal length between 50 and 90 mm will provide the most natural- looking perspective.
- Take plenty of shots to get the best illustration of the key features.
- Use image-editing software to enhance further.

Product shot taken in ‘kitchen’ photo booth!
Further tips & suggestions
When taking any shots for your marketing material make sure the camera you are using is set at its highest quality setting. For your website your image will only need to be fairly small so any camera over 3 megapixels will be more than adequate.
If you have a product with fine detail – why not do a close up shot or two of the detail to add to your product shot. Your customer can then see everything and it may just make them buy there and then.
Take it outside! Natural light on a plain background can be equally as effective. Just make sure you don’t shoot in direct sunlight as the light will be too harsh– providing shade with just a white umbrella can soften shadows and provide excellent light.
Remember soft light is good for product shots – if you need to soften the light in your newly created ‘photo booth’ hold the light further away or add another layer of greaseproof paper!
Listen to your customer feedback – what are the reasons they love your product(s), or what made them buy? Is your shot going to maximise the desirability of your product.
A white background is very common as it does give a great plain canvas for you to show off your product. However don’t be afraid to try a contrasting background. For example a bright red hat may look more striking on a green background.
Finally, make sure you take your time and get it right. A little practice can go a long way. If you are not happy with your portrayal of your product, then it’s unlikely your customer will be either.

The professional product shot, can you see much difference?
Thanks to Sara Moseley, principal photographer and owner of The Great Little Picture Company Ltd, based in the West Midlands. For more information Call 01543 677881.
[/ms-protect-content]


